Created by Julie Short www.crowtreelane.blogspot.com

WHAT YOU'LL NEED
Hook: 4mm
Terms: UK
Pompom: pompom maker & some cotton thread
NOTIONS
Tapestry needle
Stitch markers
Scissors
USEFUL INFORMATION
First stitch is done into base of turning chain
You can use any yarn that you wish or have available to do this tie-back, make sure that you use the appropriately sized hook and make your chain long enough to tie back your curtain in the manner that you like best.
My tie-back measured 60cm long, approx 2.5cm across the centre part of the tie-back and 1.5cm across the width of the arms of the tie-back.
My crochet hook is a Tulip Etimo Red 4.00mm available from
I got my pompom maker from Amazon
ABBREVIATIONS
Ch: chain
Dc: double crochet (US single crochet)
Htr: half treble crochet (US half double crochet)
Tr: treble crochet (US double crochet)
St: stitch
Inc: increase by working two stitches into next loop
PATTERN
TIE-BACK
Foundation Row: ch 112 (that is 111 plus the chain for the first row). If you wish to make your tie-back shorter or longer ensure that you have an odd number of stitches, PLUS one extra for the chain for the first row.
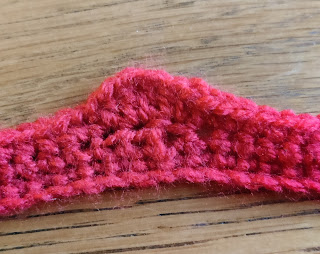
Row 1: insert hook into 2nd chain from your hook. dc across the row, turn (111 st)
Row 2: ch1, dc3, ch3, skip 3st dc48 (or to the middle 3 st if you have changed the stitch count), htr, tr, htr, dc 48, skip 3st, ch3, dc3, turn (111)
Row 3: ch1, dc53, dc inc, htr inc, tr inc, htr inc, dc inc, dc53.
POMPOM
Make an appropriately sized pompom to the point where you tie the cotton around the core (before you take it out of the maker). Ensure that the thread is very tight and secure around the pompom so that it doesn’t fall apart when separating the maker parts (mine did, which is why it looks tatty and I haven't got round to doing a new one for a photograph for this pattern yet)!
BRAID
Take a length of yarn and fold it exactly in half (you can decide how long you want it when you know what it is for, but ensure that you leave plenty for weaving in at the end).
Loop the double strand of yarn around the pompom and tie a tight knot (over the cotton thread in effect).
Trim the two lengths of double strand yarn to leave 4 strands of equal length.
I will now show you a lace-making technique to create a braid from four strands.
The strands are numbered 1 to 4 from left to right and you will cross the strands as follows (the strands change their numbers as soon as they move to a new location):-
'1 over 2', then '3 over 4', then '3 over 2'
Repeat the above procedure, gently tightening the braid up the yarn strands as you go, to create a braided length for the pompom tassel.
Stop weaving when you have reached the length of braid that you require and then join it to the tie-back.
FINISHING OFF
JOIN THE BRAID TO THE TIE-BACK
You need to identify the two back loops either side of the centre stitch (see the needle in the picture below.
Laying the pompom beneath the tie-back with the back facing upwards and the two back loops identified, use your crochet hook to pull two strands of the braid through the two loops from left to right and the other two strands through from right to left.
The strands should look like this once they are pulled through.
Finish the join by weaving in your ends across the back of the tie-back.
Wrap your tie-back around your curtains and enjoy the useful accessory that you just made for your home.


